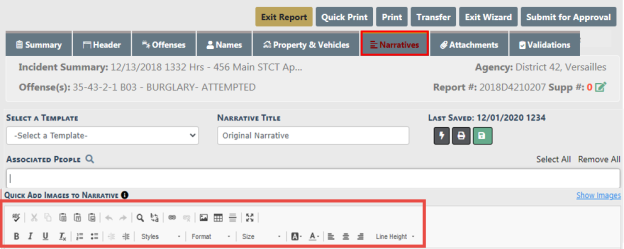
While on the Narrative tab, click on the Add Narrative button to open the Narrative entry screen where there is a built-in editor with formatting tools that supports grammar and spell checking, and provides the ability to format the body of the narrative.
You can insert an image directly into the Narrative. Before you insert an image, click into the body of the Narrative where you want to place the image.
There are two ways to insert an image on the Incident Narrative:
1. Click on the Image icon on the tool bar.

A dialog window appears giving you the option to select a file.
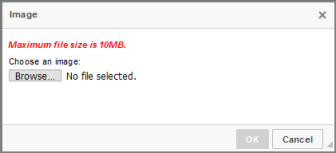
Click Browse then select an image file and click Open.
Select the Image Size, then click OK.
The image inserts into the body of the narrative.
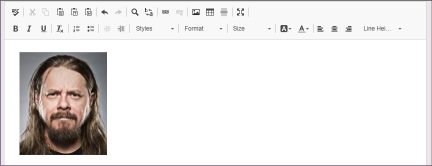
To remove the image from the body of the narrative, click on the image then press the Delete key on your keyboard.
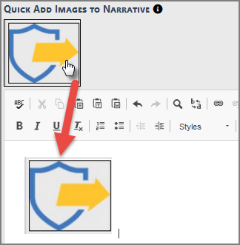
| 2. | Insert image from your Image Library. |
Note: This option is not available when entering Arrest or Case Narratives.
Select the Show Images link to display the images in your personal Image Library.
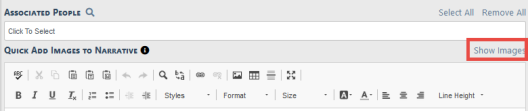
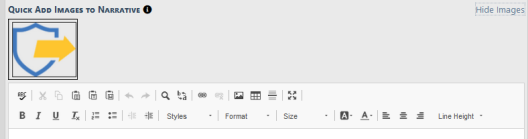
To hide the photos, click the Hide Images link on the upper right.
Click on the image to select and insert it into the Narrative.
The built-in Spelling and Grammar Checker identifies mistakes and corrects them as you type your narrative.
Some agencies may use Narrative Templates to guide you in creating their narrative. If a template is selected, the information will be applied to the narrative for you to complete and edit as required.

The Narrative Title will default to Original Narrative but you may edit the title if necessary.
Select Associated People to associate the Incident persons to the Narrative. Select as many that apply.
There are icons for printing the narrative and for saving the narrative which can be used at any time while the narrative editor is open.

As the narrative is being typed, the system auto-saves the narrative every sixty seconds in the event the connection is lost or the computer becomes unusable. The system will also provide auto-complete options as you type to make data entry easier and faster.
If the application attempts to save and is not able to reach the server, you are presented with a Warning indicating the connection may be lost. Navigating away from this screen may cause you to lose up to 60 seconds worth of your narrative. Simply reestablish your connection and select the Click Here to Try Again link so the narrative can be saved to the server and continue the auto save feature.
You should only have one workstation logged in to Online RMS at any given time.
If you have two workstations open on the Narrative screen, the first session open to the Narrative page is saved in Online RMS. If you write a lengthy narrative on the second open session, it does not save on your report.
Note: Always Save and Exit your Narrative when leaving the computer for any length of time, or move to a different computer to complete your report.
The Quick Reference icon  is a hyperlink that displays a window in the upper left hand corner which provides easy access to all the people, organizations, vehicles and property, and case narratives within the incident report.
Note: If no items exist for a particular tab, that tab does not appear. For example, if a Case Narrative does not exist with an associated Case, then the Case Narrative tab does not appear.
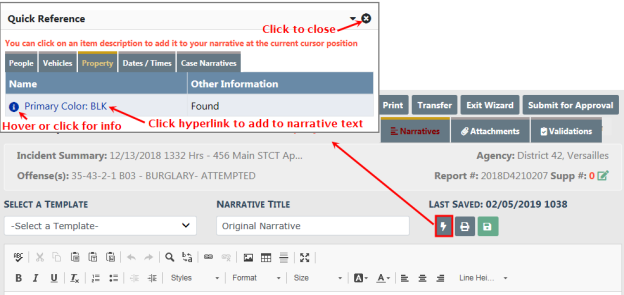
The Quick Reference window contains blue hyperlinks. By clicking on the blue hyperlink you add that particular information directly into your report’s narrative in the area where your cursor is located.
You may also place your mouse over the blue information bubbles to see additional information.
Once the narrative has been completed you can select the Save & Continue button which will display the Narrative tab for review. Additional narratives may be added to the report by selecting the Add Narrative link to the top right which will open a new narrative entry screen.
Note: If the agency is configured to bring over notes from CAD, you will see those narratives listed. You can view, edit, or delete the existing narrative as needed. A new narrative can be added by selecting the Add Narrative link.
When you have completed the narrative(s) for the report, select the Finished - Go To Next Section button to navigate to the Attachments tab.