
If configured for your agency, you can take photos directly from the Online RMS Field Arrest or Master Person Index record using the Hunter Camera integration software installed on your local machine. The software associates the images with the Master Person Index record.
| • | One or multiple Hunter Cameras can be configured. If multiple, then you can choose which camera to use. |
| • | Online RMS requires that the person record have a recent physical description. If the physical description is not recent, Hunter Camera prompts you to enter a new description. |
Follow these steps to take photos from the Field Arrest or Master Person record using the Hunter Camera integration software:
| 1. | Edit the Field Arrest or Master Person Index record, then click on the Hunter Camera button on the top right of the screen. |
If your agency and local machine is configured to use multiple Hunter Cameras, first select a camera from the drop-down list, then click on the Hunter Camera button.

| 2. | If the person's physical description does not exist or is not recent when you click on the camera button, a dialog box appears asking you to enter the physical description. |
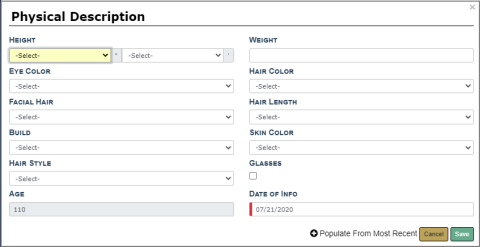
a. Enter data in the fields provided or click Populate From Most Recent on the bottom of the dialog box to pull in existing data then make the necessary updates.
b. Click Save.
c. The physical description saves and associates to the Master Person Index record.
| 3. | Take the picture then click Send in the Hunter Camera software. |
| 4. | The Hunter Camera dialog box appears, waiting for the images to save to the Master Person Index record. |
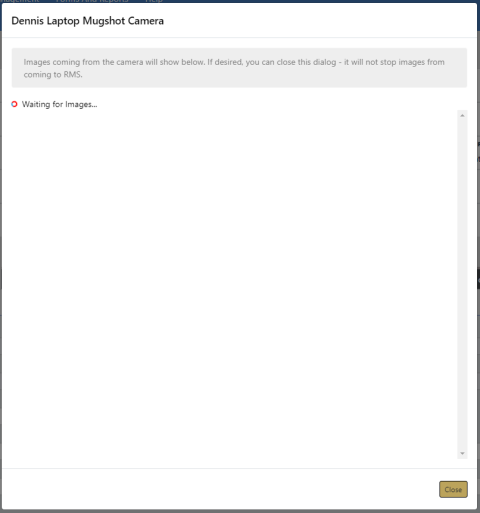
Note: You can close the dialog box or keep the dialog box open while another user transmits other images from the Hunter Camera software on their machine; as images transfer to the Master Person Index record, the images appear on the upper right of the Field Arrest record.