Once the call is initiated, dispatch information such as time and place is available. For more information on initiating a call, refer to Initiate New Call.
Note: When opening a call for editing, the application will check to see if you wish to take ownership of the call in order to edit it. Users cannot edit calls they do not own.
The Officer/Dispatcher has the ability to add any additional Incident Notes. You can return to the call later to finish your edits by accessing the Manage Call For Service sub-menu option. For more information on accessing the Manage Call For Service sub-menu, refer to Manage Calls for Service.
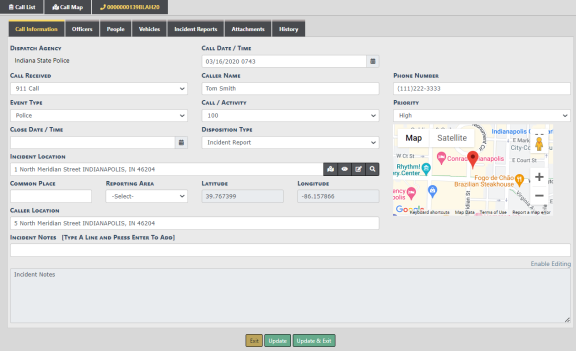
On the Edit Call screen, sub-tabs and a notes section at the bottom of the screen appear, including the following:
| • | Call Information with the caller name and the phone number. This tab opens by default. |
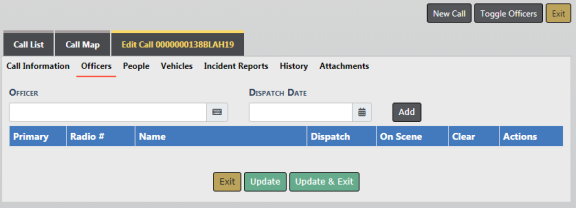
| • | Officers tab for adding officers to the call. |
| • | People tab for adding involved persons. |
| • | Vehicle tab for adding involved vehicles. |
| • | Incident Reports tab for creating a new incident from the call and assigning to the primary officer. |
| • | Attachments tab for attaching photos or document files. |
| • | History tab that shows you historical information based upon the address. |
You are taken directly to the Call Information sub-tab when the Edit Call tab opens as shown in the above image. This tab contains the caller information, location, and incident notes.
For agencies manually entering CFS records, you can select the location from Master Address/Locations. Click on the Advanced Search / Add link to search for an address then select it to add it to the CFS record.

When the address record is added to the CFS record, a View Address link appears above the location. Click on the link to view the Master Index record.

If you are creating an incident, this address also pulls into the Incident automatically.
To close a call, enter the Close Date/Time and select a Disposition from this drop-down list. For more information on closing a call refer to Close a Call.
Use the Officers sub-tab to assign the call to specific Officers and enter the Date and Time the officers are Dispatched; from this screen you also have the ability to indicate an On-scene time and Clear time.
The People sub-tab is where involved persons are added. The first step in adding a person is to search for an existing Master Person record. The Master Person Index contains a unique record for each person. If the person you are looking for does not exist, then you have the option to create the Master Person Index record for that person.
The Add Master Index Person link allows you to search the Master Person Index for an existing person record, or add a person to the Master Index. The Add Person link allows you to add a person to the Call for Service record.
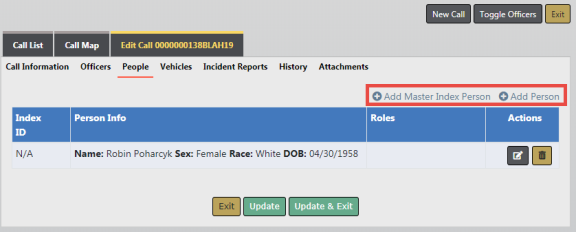
Click on Add Master Index Person to first search for the person. The Master Index Search screen for person appears. Enter the information you want to search on and click the Search button to view a list of person records that match your search criteria.
If the person record appears in the results list, click the Hand icon in the Actions columns to select it and add it to the call. If the person record does not appear in the results list, then click the Add Person link on the Person Search Results screen to create the Master Person Index record before adding it to the call.
Note: For more information on searching, selecting, and creating Master Person Index records refer to Master Indices.
The Vehicles sub-tab is where involved vehicles are added. The first step in adding a vehicle is to search for an existing Master Vehicle record. The Master Vehicle Index contains a unique record for each vehicle. If the vehicle you are looking for does not exist, then you have the option to create the Master Vehicle Index record for that vehicle.
The Add Master Index Vehicle link allows you to search the Master Vehicle Index for an existing vehicle, or add a vehicle to the Master Index. The Add Vehicle link allows you to add a vehicle to the Call for Service record.
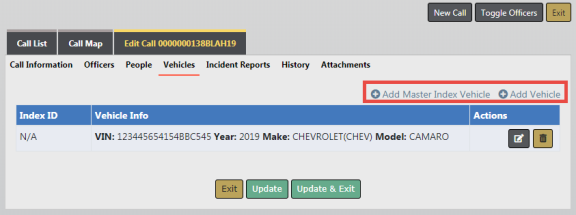
Click on Add Master Index Vehicle to first search for the vehicle. The Master Index Search screen for vehicle appears. Enter the information you want to search on and click the Search button to view a list of vehicle records that match your search criteria.
If the vehicle record appears in the results list, click the Hand icon in the Actions columns to select it and add it to the call. If the vehicle record does not appear in the results list, then click the Add Vehicle link on the Vehicle Search Results to create the Master Vehicle Index record before adding it to the call.
Note: For more information on searching, selecting, and creating Master Vehicle Index records refer to Master Indices.
The next sub-tab is the Incident Reports tab. Most agencies that are using CFS within Online RMS, or a CAD product, will have the Create Incident Report permission turned off at officer level, and make all incident reports start from CFS or CAD. In CFS under the Incident Reports tab you will see the Create Incident Report button.
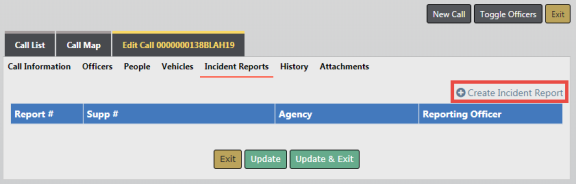
This will take you into creating an Incident Report for the officer in Online RMS.
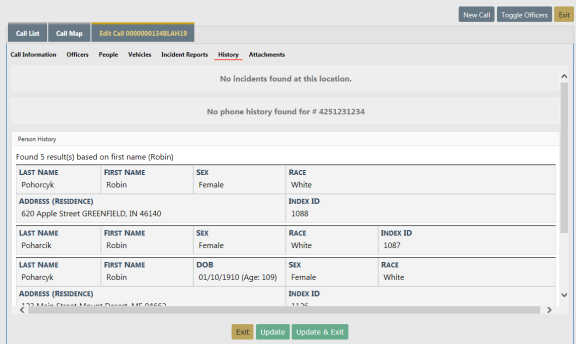
The History Tab will give you database history within Online RMS, based on the Address, the Calling Party Name, or the phone number of calling party.
The Attachments tab allows you to attach photo and document files to the call record.
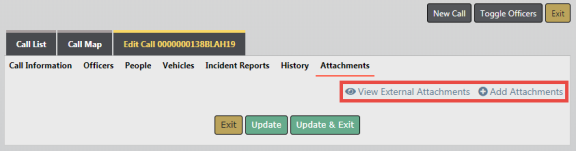
Note: For more information on adding Attachments refer to Attachments.