You can enter Case data when you create a new Case or update an existing Case.
1. If you are creating a new Case, initiate a new Case Follow-Up by using an available method. For details on the available methods, refer to Create a Follow-Up Case.
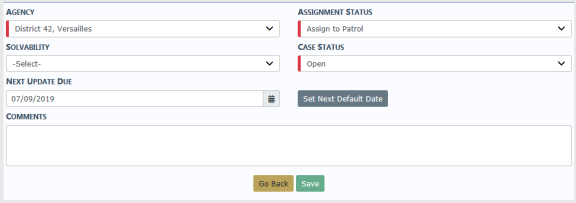
The Add Case page appears.
Enter necessary data then click the Save button to open the Edit Case screen.
| 2. | If you are updating an existing Case, search for the Case then choose update to open the Edit Case screen. For more information on searching for and updating a Case, refer to Review Cases |
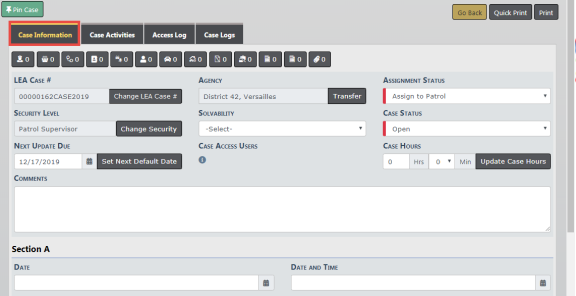
| 3. | The Edit Case screen contains four tabs: Case Information, Case Activities, Access Log, Case Logs. The Case Information tab opens by default. For general information about the four tabs, refer to Case Management Overview. |
Note: While viewing or editing, you can Pin the Case at anytime to add it to your Home Page for quick reference. For more information, refer to Case Management Overview.
Note: You can print a report wherever the print icon  or print button
  displays. For details, refer to Print Case.
| 4. | Select an Assignment Status which allows the assignment of the case to either Patrol or CID. A Case Status must also be chosen. Set a Solvability to the Case, set an Next Update Due, and add a Comment. |
| 5. | The LEA Case # generates automatically. If you chose to change the LEA Case #, select the Change LEA Case# button, select an existing Incident Report number when prompted, then click OK. |
| 6. | The CID Supervisor has the ability to change the security level of the Case by clicking on the Change Security button to open the Edit Case Security screen. After changes are made, click Save to return to the Edit Case screen. |
For more information on setting the security level, refer to Set Case Security Level.
| 7. | Next, the CID Supervisor will select the Solvability of the Case from the drop-down. |
| 8. | The CID Supervisor has the ability to change the Next Update Due date. The default is 60 days. |
| 9. | Next is the Assignment Status. The selections available vary by agency. |
| 10. | Next, the CID Supervisor will choose the Case Status from the drop-down selection. |
| 11. | The CID Supervisor has the ability to hover over the information bubble near the Case Access Users to see all the individuals who have access to the Case. If the CID Supervisor chooses to change the Security level of the case, they will select the Change Security button and select the security level to which they feel appropriate for the Case. Remember, if a patrol officer is assigned to the Case and Case is set at the Criminal Investigations Division, the Patrol Officer will not be able to access the Case. |
| 12. | Each Officer and Supervisor assigned to the Case has the ability to log the Case hours by using the Case Hours fields. After selecting the appropriate hours, select Update Case Hours. |
| 13. | Finish completing the upper section of the Case, then select the Update button. |
Note: There are icons located under the Actions column throughout the remaining sections of the Case. Hover your mouse over each icon for a description of what each one does: Review incident security/status, view incident, create a new supplement, associate an incident, print, and delete.
| 14. | Page down to the Assigned Officer(s) section. Click on the Assign Officer link to assign an officer. |

Note: One Lead Investigator Officer is required. The CID Supervisor must assign a Lead Incident Officer.
For more information on assigning officers, refer to #AssignCaseOfficer.
| 15. | When at least one officer is assigned, a View Assignment History link appears in the Assigned Officer(s) section. |

Click the link to view the assignment history.
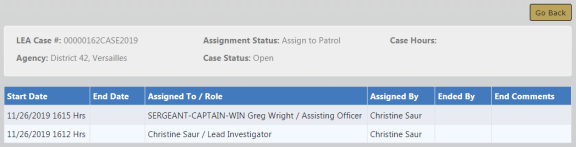
Click Go Back to return to the Case.
| 16. | Page down to the Associated Incident(s) section. The CID Investigator and the Assigned Lead Investigator has the ability to click on Create Incident to create a new Incident from the Case, or click on Associate Incidents to associate other Incidents to the same case. For details, refer to Associate an Incident. |
With proper permissions, you can create a Supplement by clicking on the Create Supplement icon  under the Actions column on Summary tab of the Incident form. If you do not see this icon, then you do not have the ability to perform this action. For more information about creating a Supplement, refer to Create Supplements.
Note: Offenses associated with the Incident appear in the Offenses section as read-only.
| 17. | To associate field arrests to the case, click on Associate Field Arrests in the Associated Field Arrests section. For more information on associating field arrests, refer to Associate a Field Arrest. |
| 18. | To associate field contacts to the case, click on Associate Field Contact in the Associated Field Contacts section. For more information on associating field contacts, refer to Associate a Field Contact. |
| 19. | Offenses that exist on Associated Incidents appear for convenience in the Offenses section as read-only. |

| 20. | Involved persons and organizations on Associated Incidents appear for convenience in the Involved Names and Organizations section as read-only. You have the option to show or hide the details by clicking the Show/Hide button. |


| 21. | Associated evidence appears in the Involved Property section as read-only. |

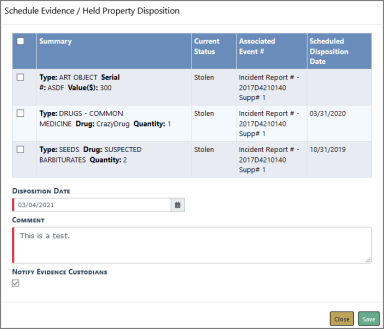
If you have appropriate permissions, you can schedule one or more dispositions of associated evidence directly from the case and notify evidence custodians.
a. Click the Schedule Disposition button to open Schedule Evidence/Held Property Disposition.
Or, you can schedule an individual property record by clicking the Schedule Disposition Date icon  under the Actions column on a specific Involved Property record, enter a Disposition Date and Comment when prompted, then click Save.
b. Check each evidence/held property record that applies, or check the box on the upper left to select all.
c. Enter the Disposition Date and Comments.
d. Check the Notify Evidence Custodians box, if applicable.
e. Click Save.
| 22. | Involved Warrants appear in the Involved Warrants section as read-only. |
| 23. | Click the Associate LEA Case link to associate LEA Cases. |
| 24. | Attach a form in the Attached Forms section by selecting from the list. |
| 25. | Click the Add Attachment link to add attachments to the Attachments section. Attachments can be photos or documents. |
1. To Assign an officer to the Case, click the Assign Lead Incident Officer or Assign Officer link.
| • | The Assign Lead Incident Officer link only appears when a lead Incident officer has not yet been assigned. It defaults the case to the officer who created the incident report. That officer can then be assigned to the case as the lead or as an assisting officer. |
| • | The Assign Lead Incident Officer link directly assigns the reporting officer to the case and the supervisor selects their role. |
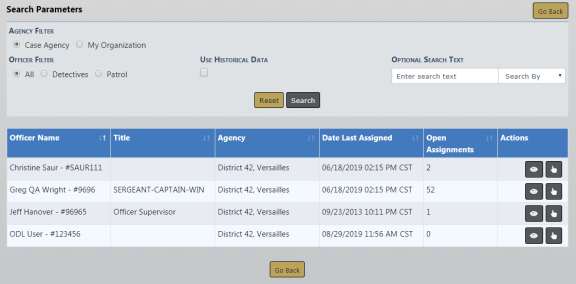
| 2. | If the Assign Officer link is used, choose from a list of officers to assign to the case. Click the select icon  to choose an officer from the results list. to choose an officer from the results list. |
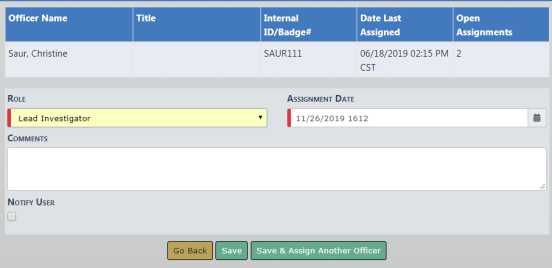
| 3. | Select the Role and Assignment Date. Optionally, select the Notify User box to send an informational Notification to officer. |
Note: You can also assign officers when creating a Case Activity. For more information on creating Case Activities, refer to Create Case Activity.
You can associate an Incident by either creating an Incident directly from the Case or selecting an existing Incident. Page down to the Associated Incident(s) section of the Case and click either the Create Incident or Associate Incident link.

1. To create an Incident and associate it to the Case, click the Create Incident link.
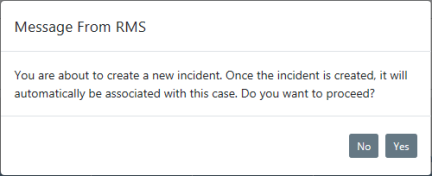
| 2. | A message appears informing you the newly created Incident will automatically be associated with the Case. Click No to return to the Case without creating the Incident, or click Yes to create the Incident and continue to the next step. |
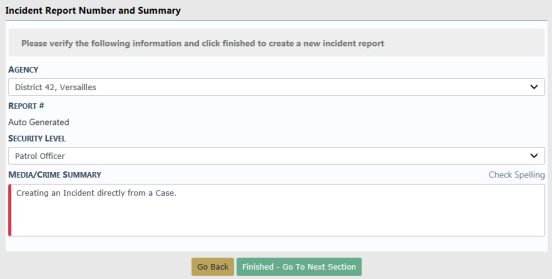
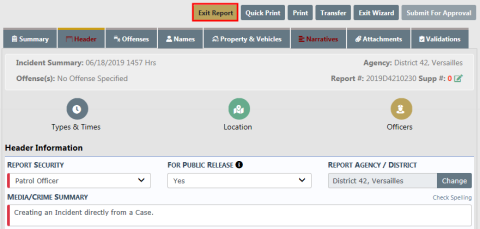
| 3. | If you chose to create the Incident, an Incident Report Number and Summary screen appears. Review and make any necessary changes. Enter comments into the Media/Crime Summary text box, then click the Finished-Go To Next Section button. |
| 4. | The Incident Report wizard opens. Add the necessary information to the Incident Report. Click the Exit Report button on the top of the screen at any time to return to the Case. For more information on entering data into various tabs of the Incident Report, refer to Incident Report Tabs. |
| 5. | The newly created Incident Report appears in the Associated Incidents(s) grid of the Case. |

1. To associate an existing Incident, click the Associate Incident link to open the Incident Search screen.
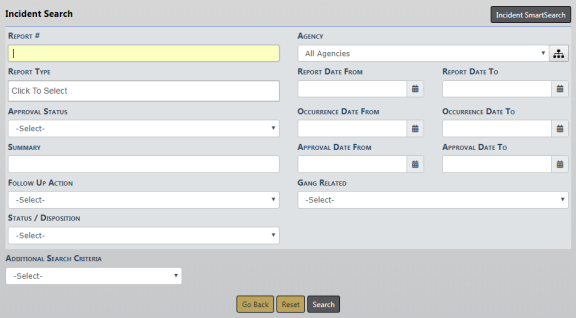
| 2. | Search for the Incident and select it from the results grid. For more information on searching for Incidents, refer to View Incident Reports. |
| 3. | The selected Incident Report appears in the Associated Incidents(s) grid of the Case. |
1. To associate a Field Arrest to the Case, click the Associate Field Arrest link.

| 2. | A Field Arrest Search screen appears. |
| 3. | Search for the Field Arrest you want to associate to the Case. For details on searching for a Field Arrest, refer to Search Field Arrests. |
| 4. | Select the appropriate Field Arrest from the results grid by clicking on select icon in the Actions column. The selected Field Arrest then appears under the Associated Field Arrests section of the Case. |
1. To associate a Field Contact to the Case, click on the Associate Field Contact link.

| 2. | A Field Contact Search screen appears. |
| 3. | Search for the Field Contact you want to associate to the Case. For more information on searching for a Field Contact, refer to Search for a Field Contact. |
| 4. | Select the appropriate Field Contact from the results grid by clicking on select icon in the Actions column. |
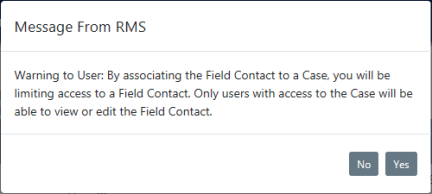
| 5. | A warning message appears informing you that by associating the Field Contact to the Case, limited access to the Field Contact occurs. Only users with access to the Case are able to view or edit the Field Contact. Click No to return to the Case without associating the Field Contact, or click Yes to associate the Field Contact to the Case. |
| 6. | If you chose Yes, the selected Field Contact then appears under the Associated Field Contacts section of the Case. |
1. To set the Security Level of the Case go to the top of the Case Information tab. Click the Change Security button to display the Security Setting screen.

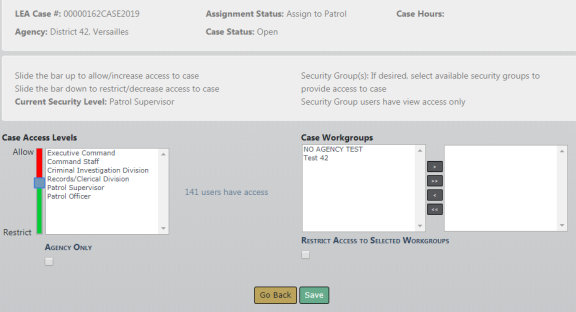
The CID Supervisor only has the ability to restrict up to the level of Criminal Investigations Division. If they restrict further, the would not have access to the Case. At this point, the CID Supervisor has the ability to see what users have access to the Case.
| 2. | To adjust the security slide the bar up or down that is located just left of the Case Access Level. Sliding the bar up will allow more users access to the case, sliding the bar down will restrict access. Security can further be adjusted by assigning the case to a Security Group. Anyone within the Case Access Level box, and persons included in the Security Group, will have access to the case. If the box located below the Security Group is checked, this will restrict access to only persons in the Security Group and the officer assigned to the case. |
Note: If the user making the assignment is not part of the Security Group they will not have access to the case if the Restrict Access box is checked.
| 3. | Click the Save button. |
Ensure that person(s) who are not supposed to have access to the incident report cannot access the report; the incident security must be set. Associating a report to a “Case” which has restricted access will NOT restrict access to any incident report associated with that case. The incident report security has been restricted as well if you want to secure the incident report access. Incident security can be set at the time of approval of the report or by the USER reviewing the incident report. The supervisor reviewing the “incident report” cannot restrict access above his level. This prevents anyone from “locking” themselves out of the report.
The Lead Investigator along with the CID Supervisor needs to remember that if the Case security is changed, it does not automatically change the security of the associated Incident Report. The Lead Investigator and/or CID Supervisor must also change the security of the Incident Report if deemed appropriate.