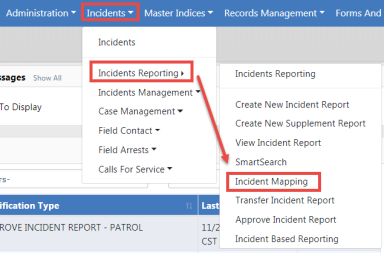
To access Incident Mapping, click on the Incidents Reporting drop-down menu on the top Navigation Bar, then click on Incident Mapping.
Incident Mapping contains two windows that overlay the map:
| • | Filter Options |
| • | Current Query |
The Current Query displays search results based on the defined Filter Options.
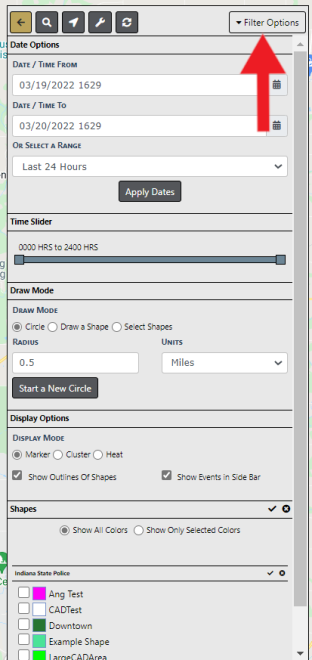
| • | Filter Options – Clicking this button hides the Filter Options window. |
| • | Date Options – Select a start date and time and an end date and time. You may also select a date range from the drop-down list, such as Last 24 Hours, Week to Date, Last Week, Month to Date, etc. There is also a Time Slider if you want to select just a specific Time range. Click the Apply Dates button. |
| • | Draw Mode – This allows you to select a Circle Radius, Draw a Shape, or Select Shapes. If you select the Circle option, you need to select Radius and Units. The Radius and Units defaults to 0.5 Miles. |
| • | Display Options – These are options on how the search results display. |
| • | Shapes – are the Areas to which you want search results to be returned. Check the box next to the applicable areas then click the Apply Selected Shapes button when it appears. The Apply Selected Shapes button does not display until at least one area box is checked. |
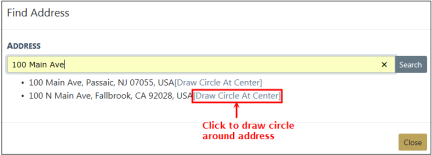
| • | Search Address - To search for a specific address, select the magnifying glass icon  on the top of the window to open the search window. on the top of the window to open the search window. |

Enter the street address then select the Search button or press Enter to display a list of matching addresses. Click on the [Draw Circle At Center] link if you want to draw a circle on the map around a specific address from the list.
| • | Configure - To configure what and how event types Incidents, Active Warrants, Court Papers, and Calls for Service are displayed on the map, select the Configure icon  . . |
Your search results reflect what you select in the Basic Configuration tab.
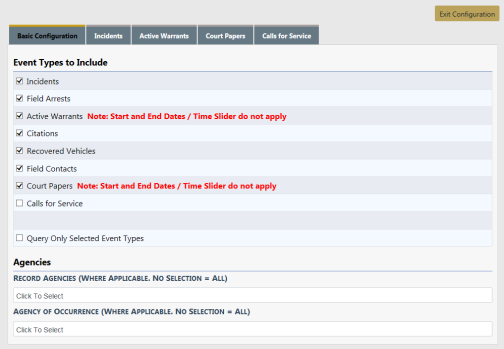
After making your selections on each tab, click the Exit Configuration button to return to the previous screen.
| • | Exit Incident Mappings window. To exit the Incident Mappings window and return to your Home Page, select the Go Back icon  . . |
| • | Center Map - To center the Map on the screen, select the Center Map icon  . . |
| • | Refresh - Select the refresh icon |
| • | Hide or Unhide Filter Window - To hide or unhide the Filter Window, select the Filter Options button. |
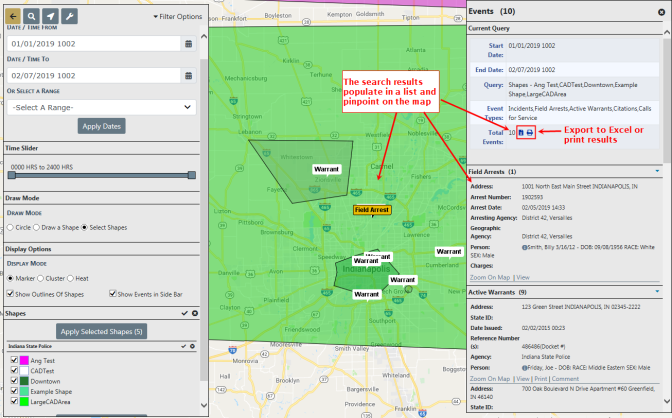
From the Current Query section of the Query Window you have the ability to print or export the search results to an Excel document.
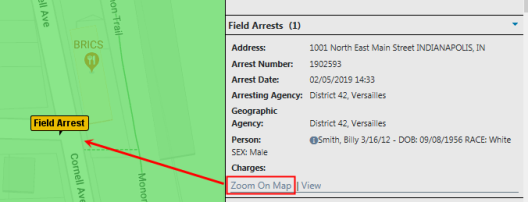
Click the Zoom On Map link to zoom to a specific event on the map.
Anyone with permissions to view warrant locations on the Incident Map can also view, print and comment directly from the map to the Warrant. You must enter a Log Date and Time, Action Type and Comment. This will be added to the Warrant Log.
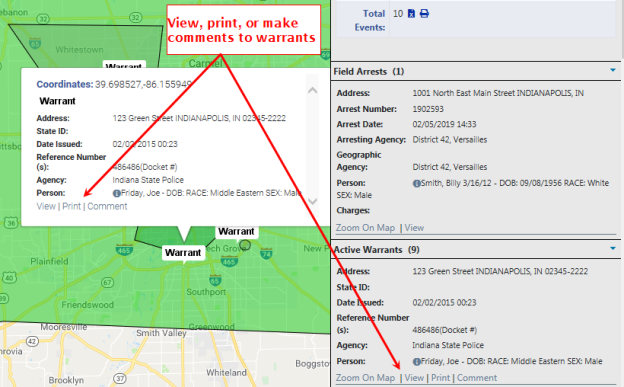
Click the Save button to commit the comment to the log, or click Cancel to abort the log entry and return to the map.