Fleet Managers, with proper permissions, have the ability to edit crash reports.
There are two ways to access the Edit Fleet Crash page:
| • | By searching for a specific crash report using the Crash Search page. |
| • | From the fleet vehicle itself. |
Perform the following steps to edit a crash report:
1. Access the Fleet Management Dashboard. For details on accessing the dashboard refer to Fleet Manager.
| 2. | Choose one of the following methods to access the Edit Fleet Crash page: |
From the Crash Search page:
a. Click on the Manage Fleet Crashes button on the Fleet Management Dashboard.
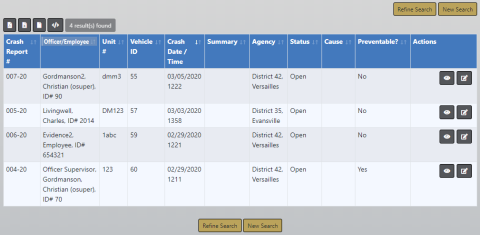
b. The Crash Search screen appears. Search for the crash report you want to update. For instructions on how to search, refer to Search Fleet Crash Reports.
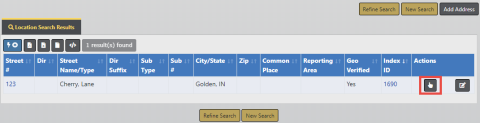
Search results example:
From the Fleet Vehicle:
a. Search for the vehicle and click the edit icon  to update the vehicle record. For more information on searching for a vehicle record, refer to Edit Vehicles .
b. On the Edit Vehicle screen, page down to the Crashes section of the fleet vehicle record.

| 3. | Click the edit icon on the crash report you want to update. The Edit Crash form opens. |
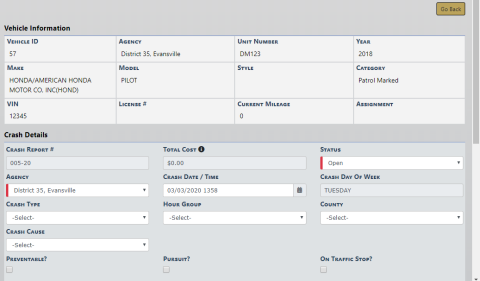
Note: Data in the Vehicle Information section comes directly from the fleet vehicle record and cannot be modified.
Note: Total Cost is read-only and it calculates automatically: Tow costs + service/maintenance costs.
1. Modify the necessary information in the Crash Details section, then click the Update button to save.
Note: Fields that are grayed-out cannot be modified.
1. Optionally, search for and choose an existing address.
Note: The location must exist in the Master Address Index. If the location doesn't exist, with proper permissions, you can add it to the Master Address Index then select the newly added record. For more information on Master Index, refer to “Master Indices Overview”.
a. Click Add Location to open Location Search.

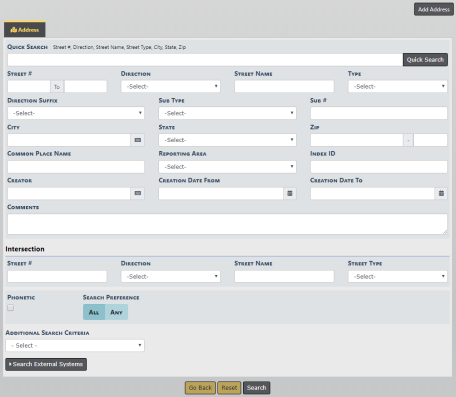
b. Enter as much information as possible to find the address record, then click the Search button to display results that match your entered criteria.
For more information on searching address records, refer to the Address Search section of Searching Master Records.
c. Click on the select icon  to select the appropriate address record that appears in the grid.
When address you need does not exist:
When the address you are looking for does not exist in the system, you can, with appropriate permissions, add the record then select it.
Click on the Add Address button on the top right to add a new address record. If the button does not appear on your screen, then you do not have appropriate permissions.
For more information on adding an address record, refer to Adding Address.
d. The address is added to the Location Details grid of the Crash Report.

e. Optionally, enter Location Comments then click on the Update button to save.
f. Click the Change Location link to change the address, if applicable. The link open the Address Search form.
g. Click the Remove Location link to remove the location and location comment from the grid, if applicable. Then confirm deletion.
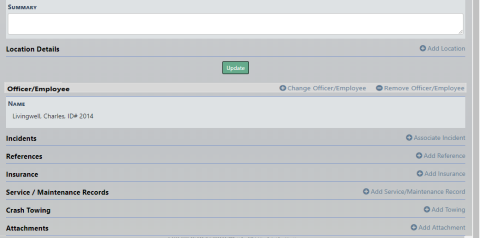
1. Click on the Add Officer/Employee or Change Officer/Employee link, whichever applies.
| 2. | The Assigned Officers/Employee windows appears. |
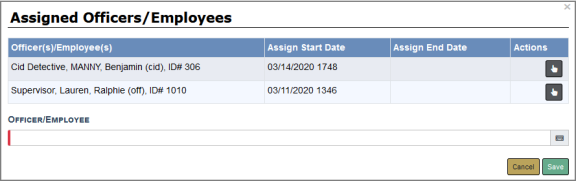
Officers/employees assigned or previously assigned to the vehicle the past twelve months appear in the list.
| 3. | Select the appropriate officer/employee from the list provided. |
| 4. | Click Save. |
To remove an officer/employee, click on the delete icon then confirm deletion.
1. If applicable, click on the Associate Incident link to associate the crash report with an incident.
| 2. | The Incident Search window opens. Enter the search criteria and click the Search button to display the results, then select the appropriate incident from the results grid. For more information on searching for incidents, refer to Incident Search. |
| 3. | To remove an associated incident from the crash report, click the delete icon  then confirm deletion. then confirm deletion. |
If the delete icon is not present, then you do not have appropriate permissions.
Note: This removes the association to the incident from the crash report; it does not remove the incident from the system.
1. If applicable, click on the Add Reference link to include a reference.
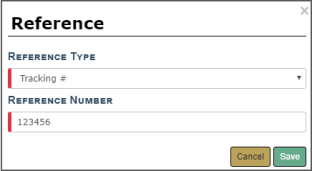
| 2. | Select the Reference Type. |
| 3. | Enter the Reference Number. |
| 4. | Click Save to add it to the crash report. |
| 5. | To edit a reference record, click on the edit icon , make changes, then click Save. |
| 6. | To delete a reference record, click on the delete icon , then click Yes to confirm deletion. |
1. If applicable, click on the Add Insurance link to add insurance to the crash report. The Insurance window opens.
| 2. | Enter the information, then click Save. |
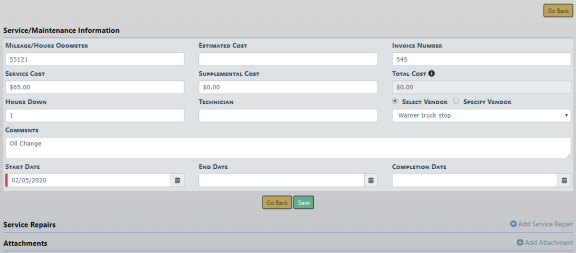
1. If applicable, click on the Add Service/Maintenance link to add service/maintenance to the crash report. The Service/Maintenance window opens.
| 2. | Enter the values into the Service/Maintenance window. |

Note: Any field with a red left-hand border is a required field. You must complete required fields to continue.
For vendor, Select Vendor from a list or click Specify Vendor enter your own.
| 3. | Click Save to create the Service Maintenance record, Cancel to return to the Edit Fleet Vehicle window without saving, or click Add Details to add Service Repair records. |
| 4. | If you chose to Add Details, the Edit Service Record appears. |
Note: Items specific to crash reports:
| - | Maintenance records created within a crash report are only visible within the crash report, not in the Service Maintenance grid on the fleet vehicle itself. |
| - | Costs associated with service maintenance records within a crash report are not included in the Cost of Ownership on the fleet vehicle itself. |
| - | Mileage associated with the service maintenance records within a crash report are not used when determining Next Service Mileage and Next Service Date on the fleet vehicle itself. |
| 5. | To edit an existing service/maintenance record on the crash report, click on the edit icon , make changes, then click Save. |
| 6. | To delete a service/maintenance record from the crash report, click on the delete icon , then click Yes to confirm deletion. |
1. If applicable, click on the Add Towing link to add towing to the crash report. A Vehicle Towing window opens.
| 2. | You can Select Company then choose from a drop-down list, or Add Company and complete the necessary information. |
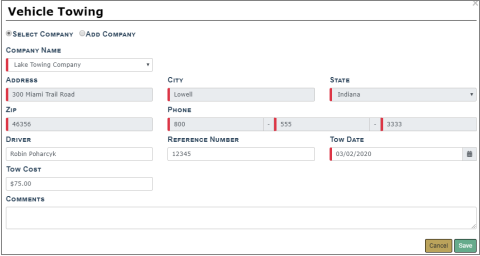
| 3. | Click Save to add the towing record to the crash report. |
| 4. | To edit an existing towing record on the crash report, click on the edit icon , make changes, then click Save. |
| 5. | To delete a towing record from the crash report, click on the delete icon , then click Yes to confirm deletion. |
1. If applicable, click on the Add Attachment link to attach a photo or document to the crash report.
For more information on adding attachments, refer to Add Attachments.
For general information about attachments, refer to Attachments Overview.