
This area presents a grouped list of all Notifications for the user. The Notification Types can be:
| • | Information on the status of the user's Incidents or Arrests |
| • | Messages sent to the user by another user or an administrator |
| – | Alerts from Master Indices subscriptions |
| – | Alerts from Warrant Logs |
| – | Alerts from a Public Custom Form submission. |
| – | Other system notifications based on the user's role |
You can view a list of notifications two different ways: New notifications and all active notifications.
When new notifications arrive, the total number of Notifications near the top right of the screen appear with a red background. The red turns to a white background when the messages have been red as shown in the example.
Click on the notification indicator to view the list of Notifications and Broadcast messages. Click on each tab to view.
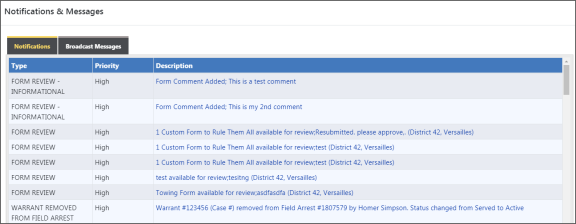
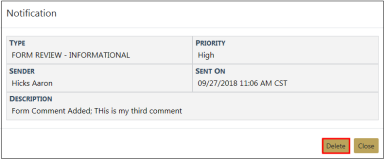
Click on a notification link to open the View Notification window.

Depending on the type of notification, it can be canceled, replied to, reassigned, deleted, or acted on. The action buttons that appear on the bottom of the window vary by type of notification.
Under the Notifications & Messages grid, click the Clear New button at the bottom of the screen to clear all new notifications.
Click Close to close the window.
A list of all your notifications are displayed on the Home screen in a grid. A maximum number of notifications appear in the grid at one time. The Count of each Notification Type displays on the left.
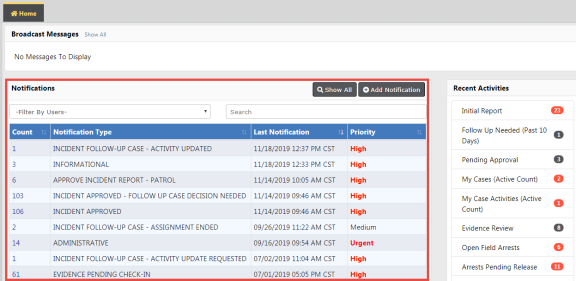
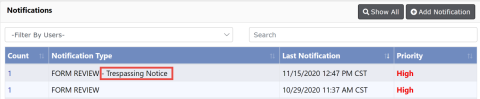
Note: With Caliber Public Safety version 11.5 and higher, a Notification Type sub-category includes the Custom Form name, if applicable, for improved usability for reviewing Custom Forms submissions and taking action.
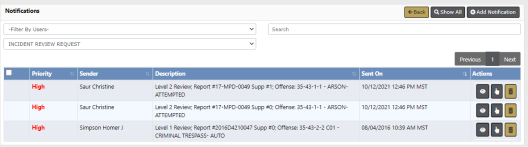
To see all Notifications for a particular Notification Type, click on the Count in the first column of that Notification Type. In the below example, three Incident Review Request records display.
With appropriate permissions, you can click on the hand icon under the Actions column to Take Action.
Enter text into the Search box to display only messages that match your entered text.
If you set up User Groups then you see the Filter By Users option. For more information on User Groups refer to your agency administrator.

Click the Show All button at the top of the grid to display all notifications. Check a box to the left of a notification to display the Delete Selected box on the upper right, then confirm deletion when prompted.
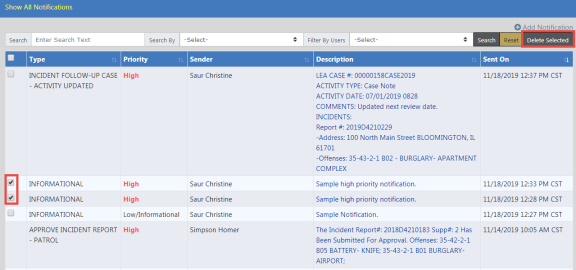
Click on any column heading to sort the list by that column. For example, click on the Type column heading to sort the list by Type.
Click on a notification link in the Description column to open the Notification window.

Depending on the type of notification, it can be canceled, replied to, reassigned, deleted, or acted on.
You have the ability to Search for specific notifications in the Show All Notifications grid by entering text and selecting options from drop-down lists.
Enter text into the Search field. Select an option from the Search By and Filter by Users drop-down lists. Click the Search button to apply your search criteria.
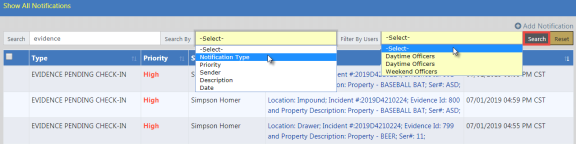
Click the Reset button to clear the entered Search text.
There are up to four ways to Delete Notifications that have the delete option.
| • | From the New Notification message. Refer to New Notifications . |
| • | From the link in the Description column of the Show All notifications grid. Refer to Show All Notifications. |
Check the box in the Show all notifications grid.
Check the box next to the notification you want to delete, then click Delete Selected when the button appears.
| • | Click on the count number under the Count column in the Notification grid, then click the Delete icon  under the Actions column. Refer to Show All Notifications. under the Actions column. Refer to Show All Notifications. |
| • | For view only informational Notifications: |
| – | When taking action on a view only information Notification, click on the Take Action & Delete button to take action and delete the notification. |
User-initiated notifications can be sent by clicking the Add Notification link to display the Add Notification screen.
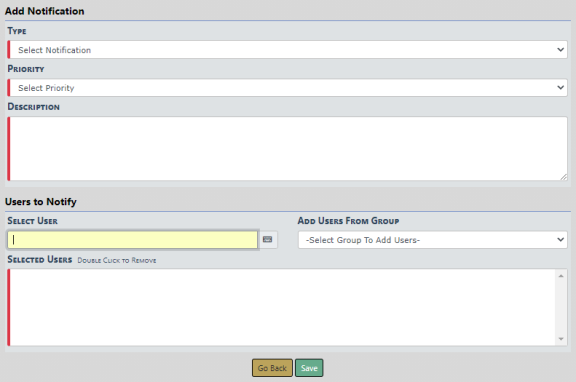
Select the Type and Priority from the drop-down lists and enter a Description.
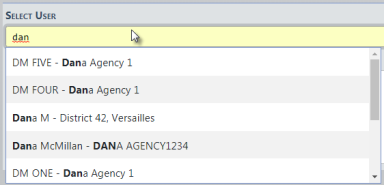
In the Select User field, begin entering a user's name then choose from the list that appears based on the text you enter. You can choose one or multiple names that are to receive your message. When choosing names, the names appear in the Selected Users box. Double Click on a name to remove.

Optionally select Add Users From Group to add users from a defined group, such as Daytime Officers, Second Shift Officers, etc. Selecting a group adds the users of that group to the list of selected users.