 on the record you want to update.
To edit a Criminal Complaint record follow these steps:
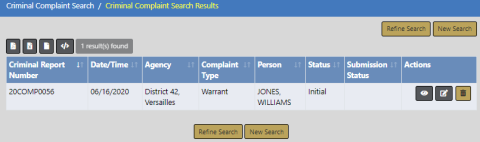
| 1. | Search for the Criminal Complaint record you want to edit or access it from Recent Activities on your home page. |
For instructions on how to search refer to “Criminal Complaint Search”.
For instructions on accessing from Recent Activities refer to Criminal Complaint Overview.
| 2. | In the Search Results grid, click the Edit icon on the record you want to update. |
| 3. | The Edit Criminal Complaint form opens. |
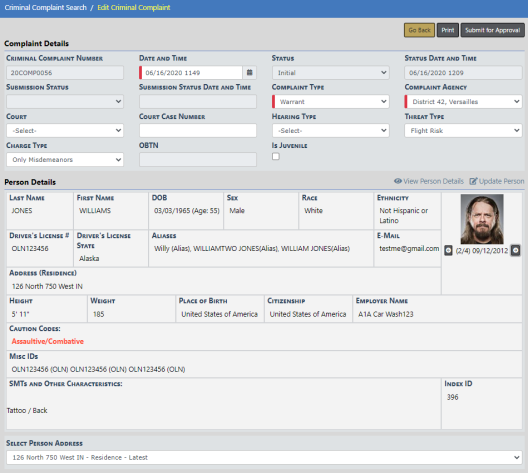
With Online RMS version 11.5 and higher, certain fields are set as required or disabled and the available Hearing Type list of values changes based on the selected Complaint Type.
Examples:
| - | If Complaint Type = Arrest, then Charge Type, Hearing Type and Threat Type list of values become disabled to not allow entry. |
| - | If Complaint Type = Warrant, then Charge Type and Hearing Type list of values becomes disabled to not allow entry and Threat Type becomes required. |
Note: Configurations for required and disabled fields are managed by Caliber Admins. If your agency uses Criminal Complaints and would like to use these configurations, please contact Caliber Public Safety Support.
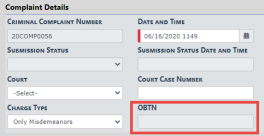
If the Criminal Complaint is associated with a Field Arrest, the Arrest Tracking Number displays as read-only. The label could show Arrest Tracking Number, or OBTN, depending on your agency's configuration.
| 4. | Select Person Address from the available choices. |
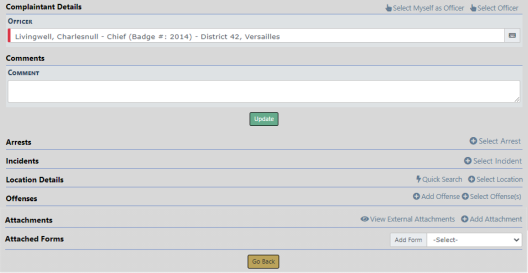
| 5. | Select Officer under the Complainant Details section. |
The select officer link displays a dialog listing all officers on associated arrests and incidents for quick selection.
You can quickly select any officer associated to the incidents and arrests identified on the criminal complaint record.
Click Select Myself as Officer to set the officer as yourself, click Select Officer to select an officer from an associated record, or type in the auto-complete field to add any other officer.
Only one officer can be chosen.
| 6. | Enter any Comments. |
| 7. | Make any necessary updates in the available fields near the top of the form, then click the Update button to save your changes. |
| 8. | If applicable, click the Select Arrest link to associate an Arrest with the Criminal Complaint, based o the Criminal Complaint person's involved records. |
Only one Arrest can be associated with the Criminal Complaint. The Select Arrest link does not display when an Arrest association exists.
The OBTN, if initially blank, populates automatically from the associated Arrest record.
For more information on arrests, refer to “Field Arrest Overview”.
| 9. | If applicable, click the Select Incident link to associate an Incident with the Criminal Complaint. |
Note: The Select Incident link only displays if there are incidents where the person on the complaint is the offender.
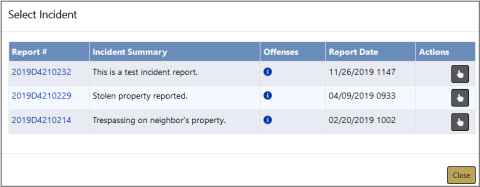
Only one Incident can be associated with the Criminal Complaint.
a. Select the applicable Incident.
b. The selected Incident displays in the grid. The Select Incident link does not display when an Incident association exists.

If there is an arrest associated with the incident where the arrestee is the complaint defendant, Online RMS adds the arrest to the complaint, if not already associated. If that arrest has an OBTN, the OBTN is also added to the complaint.
| 10. | If applicable, click Select Location then select from the displayed list, or use Quick Search to pick any address. |
Note: The Select Location link only displays if there are associated incidents.
| 11. | Click Add Offense or Select Offense(s) to include at least one Offense. |
a. If you choose Add Offense, an Add Offense dialog box appears.
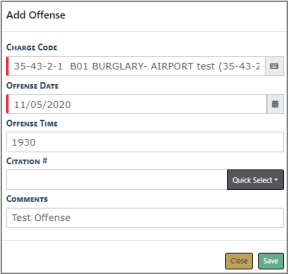
Enter the Charge Code, Offense Date, Offense Time, Citation #, and Comments where applicable.
Click Save.
Note: If you enter a charge code that is associated with Tokens, additional token fields appear. These tokens submit with each charge if the complaint is submitted to the court.
b. If you choose Select Offense(s), a list appears of offenses that are on the associated Incidents.
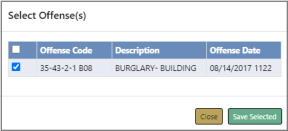
Check each Offense you wish to include, then click Save Selected.
| 12. | If applicable, click on the Edit icon to update any Court Case that may be associated to the Criminal Complaint. |

For general information about Court Case, refer to “Court Case Overview”.
For more information on updating a Court Case, refer to “Edit Court Case”.
| 13. | Optionally, add any Attachments |
For more information on adding Attachments, refer to Add Attachments.
| 14. | If Applicable for your agency, optionally attach a custom form by selecting from the list under the Attached Forms section. |
a. Once you select a custom form, the form opens. Complete the necessary information then click Save or Save and Exit.
| 15. | If applicable, click on the Print button on the top right to print the Criminal Complaint record. A PDF file opens as a new tap in your browser where you can print or save the document. If you are using Internet Explorer, refer to Printing from Online RMS for special instructions. |
| 16. | Click the Submit For Approval button on the top right, whenever you are ready to submit the Criminal Complaint for approval. |
For more information, refer to “Submit Criminal Complaint for Approval”.