
The Summary tab contains a summary of all the information that is contained in the other tabs of the current Incident Report.
Information in the Summary tab is divided into sections, such as Officers, Employees, Offenders, Victims, Narratives, etc.
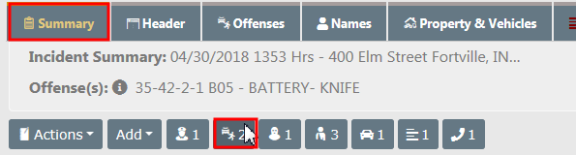
The icons under the tab headers and Incident description are hyperlinks that direct you to each section. Hover your mouse over the icon to view a description of the hyperlink.
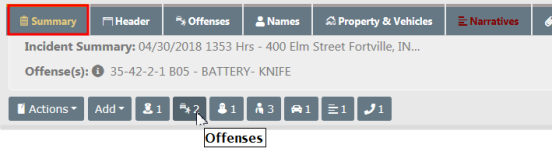
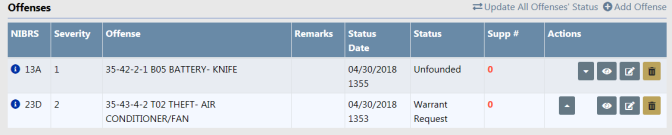
For example, select the Offenses hyperlink and you are directed to the Offenses section of the Summary tab.
Add data to the Incident Report in sections that contain an Add hyperlink. For example, the + Add Person hyperlink opens the Person Search screen to begin the process of adding a person to the report.
The + Add Field Arrest hyperlink under the Field Arrests section provides the ability to associate a Field Arrest to the report, or you can create a Field Arrest from the Offender section and associate it to the Incident automatically.
Beginning with Online RMS 11.7.0, with appropriate permissions, you can create a Field Arrest and import data from an existing Incident or Calls for Service record into the arrest record, avoiding unnecessary data entry. This process also associates the Field Arrest to the Incident or Calls for Service record automatically.
| – | Click on the Add Field Arrest icon  next to an offender's name on the Summary or Names tabs. next to an offender's name on the Summary or Names tabs. |
| – | For details on the create and import field arrest process, refer to Create Field Arrest from Incident. |
The Calls for Service section is located toward the bottom of the Summary tab. Page down or click on the icon hyperlink to go directly to the CFS section.

In the Calls For Service section, view the associated CFS by selecting the View icon  under the Actions heading, click the Add Call for Service link to search for and associate an existing call for service record to the incident, or click the delete icon
  to remove the association.

| – | The Add Call for Service link appears for any user able to edit the incident report. |
| – | The delete icon appears when the user is the original creator of the association or the user has permissions to delete the association. |
| – | When deleting the association, a prompt appears asking you to enter a Comment as to why you are deleting the association. The comment, report number, and dispatch number are stored in an audit table. |
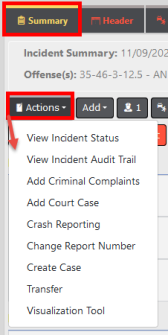
The Summary tab also contains an Actions button that allows you to perform certain actions. Click on the button to view a drop-down list of choices from which to choose. This list is based on permissions and varies by agency.
Note: Authorized users can add attachments to supplement 0 while outside the normal approval workflow and when the Incident is not in edit mode. For details, refer to Add Attachments Outside Incident Workflow.
This option is available providing you have the appropriate permissions and the feature is turned on for your agency.
Perform one of the following options on the Summary tab to add a Criminal Complaint:
| – | Click the Actions menu button, then click Add Criminal Complaints. |
| – | or Page down on the Summary tab to the Criminal Complaints section and click Add Criminal Complaints. |
The Create Criminal Complaint form opens.
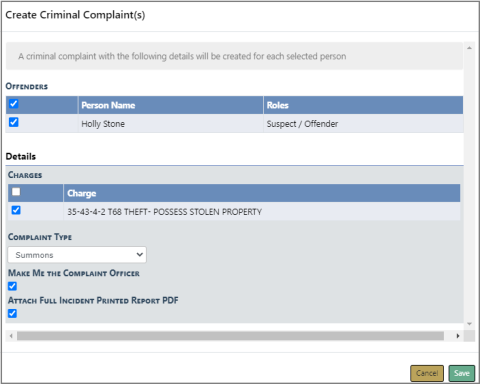
Select the Offenders.
| – | The names listed are only the Incident suspect/offenders that do not already have a criminal complaint associated with the incident. |
| – | A Criminal Complaint is created for each person selected. |
| – | Only displays. |
Select one or more Charges.
| – | At least one charge is required. |
Select the Complaint Type from the drop-down list.
If applicable, check the box to make yourself the Complaint Officer.
If the Incident has Custom Forms, an option displays allowing you to select any or all Custom Forms to be associated with the criminal complaint.
If applicable, check the box if you want to attach the full Incident Printed PDF Report.
| – | If the Incident has Custom Forms and it is configured to create a fillable form, the fillable form PDF is associated with the criminal complaint instead of the custom form. |
Click Save to create the Criminal Complaints and associate them to the Incident Report supplement automatically.
| - | The complaints are listed in a grid on the Summary page. You can further edit the complaint and submit for approval. |
Perform one of the following options on the Summary tab to add a Court Case:
| – | Click the Actions menu button, then click Add Court Case. |
| – | or Page down on the Summary tab to the Court Case section and click Add Court Case. |
The Create Court Case form opens.
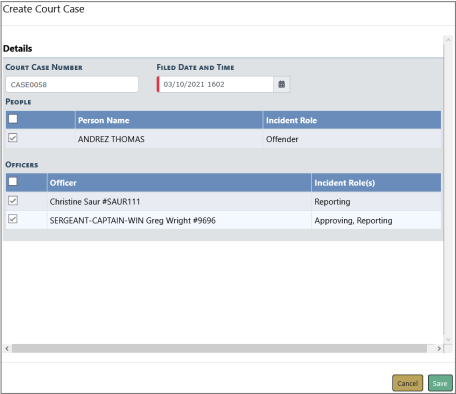
Enter the Court Case Number.
Select the Filed Date and Time.
Select the People involved.
Select the appropriate Officers.
Click Save to create the Court Case and associate to the Incident Report supplement automatically.
You can associate an incident report with another. There are two ways to do this:
| • | Click on the Add Associated Incident link in the Associated Incidents section of the Summary tab to search for and select an Incident. |
| • | An association to another incident happens automatically during the Copy Incident process, if utilized by your agency. For more information on the Copy Incident process, refer to Copy an Incident. |
Incidents that are hidden do not appear in this grid unless you have proper permissions to view them. For more information on hidden Incidents, refer to Incident Security
If configured for your agency, this option is a single sign-on to the Ethos home page for States where the LexisNexis Ethos Crash application is available.