Create Field Arrest and Import Data
Beginning with Online RMS 11.7.0, with appropriate permissions, you can create a Field Arrest and import data from an existing Incident or Calls for Service record into the arrest record, avoiding unnecessary data entry. This process also associates the Field Arrest to the Incident or Calls for Service record automatically.
Follow these steps to create a Field Arrest and import the data:
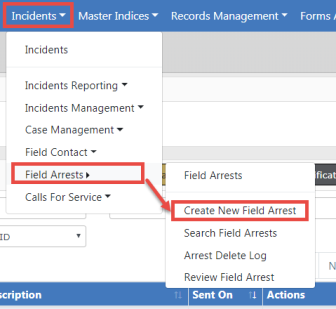
1. Initiate a new Field Arrest from the Incident top menu.
Note: If you are creating a Field Arrest from an Incident record, skip to Step 6. For more information on creating an arrest form an Incident, refer to Create Field Arrest from Incident.
|
2.
|
Search for and select the person. |
For more details on searching and selecting the person, refer to the first few steps of Create Field Arrest Manually.
|
3.
|
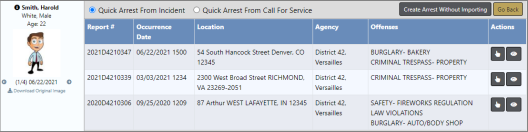
If the person you select is associated with existing Incident or Calls for Service records, the Field Arrest Quick Booking screen appears. |
|
•
|
Offender information and photo, if available, appears on the left of the screen. |
|
•
|
This screen allows you to optionally import data from either an Incident or Calls for Service record, or create an Arrest without importing data. To create an Arrest without importing, refer to Create Field Arrest Manually. |
If the person you select is not associated with existing Incident or Calls for Service records, the Add Field Arrest screen opens rather than the above. You must manually enter Field Arrest data. For instructions, begin with the Add Field Arrest section of Create Field Arrest Manually.
|
4.
|
Select either Quick Arrest From Incident or Quick Arrest From Call For Service. |
The data that displays in the grid changes based on your selection.
|
•
|
The grid displays the Incidents or Calls for Service records to which this person belongs, and only those records that you have permissions to see within your organization. |
|
•
|
If you select Incident, and do not have permissions to access an Incident Supplement to which the offender is associated, that Incident does not appear in the grid. |
|
5.
|
Select  the appropriate record in the grid to import. the appropriate record in the grid to import. |
|
6.
|
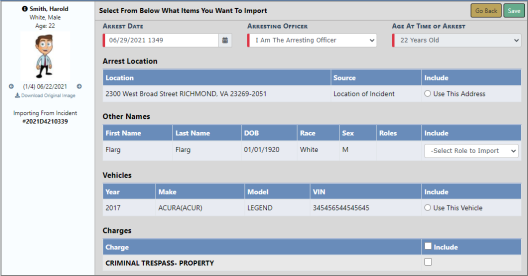
The Import and Create Field Arrest screen appears. |
|
•
|
The person's name and other information appear on the left along with a photo, if one exists. |
|
•
|
The data source appears under the person's photo: |
|
-
|
Importing from Incident or Importing from Dispatch. |
|
-
|
The Incident or Dispatch number. |
|
-
|
If importing data from an Incident, the people and addresses have Master Person and Address Indices records. |
|
-
|
Calls for Service people and addresses may not have Master Person and Address Indices records; however, you are given the option to create them. |
|
•
|
The fields prepopulate with Information from the data source automatically; however, you can make any necessary changes. |
|
7.
|
The Arrest Date defaults to today's date. Click into the field and select another date if needed. |
|
8.
|
The Arresting Officer defaults to the logged in user. Other officers defined in the data source also appear on the list. To change to another officer, click into the field and select the appropriate officer from the list. |
|
9.
|
Age at Time of Arrest is calculated for you based on the offender's birth date. This field is read-only. |
|
10.
|
Locations defined in the data source are listed under Arrest Location. If multiple locations exits in the data source, they all appear here. |
Incident and Calls for Service location data are handled differently during the import process:
|
•
|
Incident Locations are Master Address Index records. Click Use This Address to choose a location. |
|
•
|
Calls for Service Locations may not be Master Address Index records. If not, the Create Address button appears. |

Click the Create Address button to create the Master Address Index record, then the button changes to Use This Address.
|
11.
|
Other Names and Victim Names also appear on this screen, depending on whether or not they exist in the data source. The example used only shows Other Names. |
|
•
|
On each name, click the drop-down box to select which Role to Import. |
|
•
|
When importing CFS data, the Create Person button appears if the person is not a Master Person Index record. Click the button to create the Master Person Index record, then you can select the Role to Import. |

|
-
|
When creating a new person, the import process also updates the CFS event person record with the Master Person Index. |
|
12.
|
Select the Vehicle, if applicable. |
|
13.
|
Select the Charge, if applicable. |
Additional fields appear.
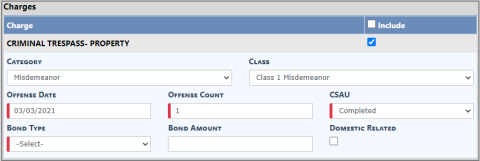
a. Arrest charges have bond fields that the Incident doesn't.
b. Select the Bond Type and enter the Bond Amount.
c. Update other fields as needed.
If you are importing Incident data outside of an Incident and you have an existing open Supplement:
a. The process creates the Field Arrest.
b. The process associates the Field Arrest to the open Supplement and the role of Arrestee is added to the offender.
OR
If you are importing Incident data outside of an Incident and you do not have an existing open Supplement:
a. A prompt appears asking if you want to create a Supplement.
|
-
|
If Yes, then the process creates the Field Arrest, associates it within the Supplement, and adds the role of Arrestee to the offender. |
|
-
|
If No, then the process associates the Field Arrest to whatever Supplement the offender was added, and the role Arrestee is not added to the offender. |
|
16.
|
The Edit Field Arrest screen opens. |
|
17.
|
Make any necessary changes to the Field Arrest record. |
For more information on editing a Field Arrest, refer to Edit Field Arrest.