 icon in the Actions column of the Warrant you want to edit. For more information on searching for a warrant, refer to Warrant Search.
From the Warrant Search Results page, select the Edit icon icon in the Actions column of the Warrant you want to edit. For more information on searching for a warrant, refer to Warrant Search.
The Edit Warrant page appears.
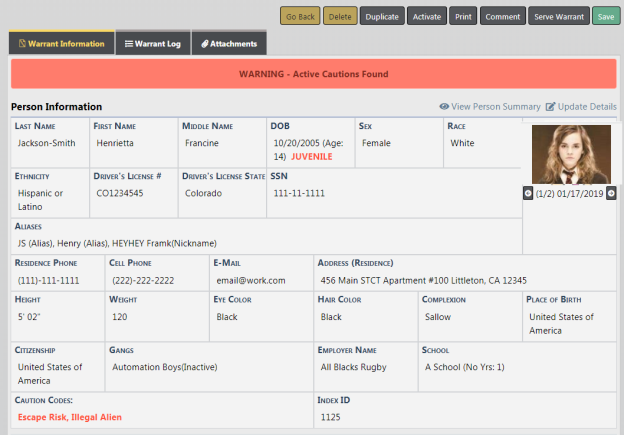
The Edit Warrant page contains up to eight action buttons on the top right of the window:

| • | Go Back returns to the previous page. |
| • | Delete a warrant, refer to Delete Warrant. |
| • | Duplicate a warrant, refer to Duplicate Warrant. |
| • | Activate a warrant from initial status, refer to Activate Warrant. |
| • | Print a warrant, refer to Print Warrant Report. |
| • | Log a Comment, refer to Warrant Log. |
| • | To Serve Warrant, refer to Serve Warrant. |
| • | Save applies your updates to the database. |
Note: The appearance of the action buttons are controlled by the warrant Status. For example, the Serve Warrant button does not appear when the warrant status is Served.
The Edit Warrant page contains three tabs:

| • | For information on the Warrant Information tab, refer to Warrant Information Tab. |
| • | For information on the Warrant Log tab, refer to Warrant Log Tab. |
| • | For information on the Attachments tab, refer to Attachments Tab. |
The Edit Warrant window opens to the Warrant Information tab by default. For information on Warrant Log refer to Warrant Log, and for information on Warrant Attachments tab refer to Warrant Attachments.
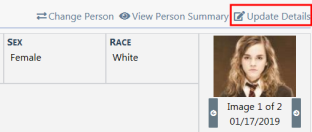
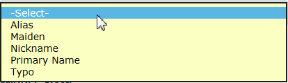
Select the down arrow to the right of the Select an Alias field to choose another name from the drop down list. If there are no names to choose from and you need to add an Alias, select the Update Details link in the upper right corner to open the Person Details page.
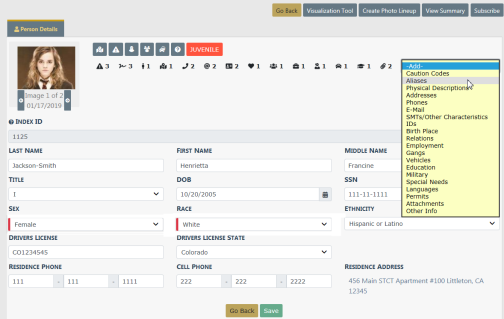
There are two ways to add an alias:
| • | Click into the Add field on the Person Detail window and select Aliases from the drop-down list. |
| • | Or scroll down to the Aliases section of the Person Detail window and click Add Alias. |
Either method will open the Alias window.
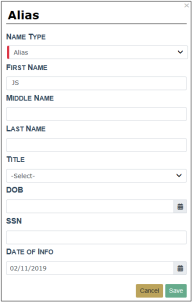
Complete the fields and select Save.
Click Go Back to return to the Edit Warrant window and page down to the Select An Alias section. The new Alias you entered now appears in the drop-down list.
Page down on the Edit Warrant screen for other associated data, such as Service Addresses, Warrant Information, Incidents, Calls, Officers, Field Arrests, Charges, and Charging Agency information. You can view, update, add, or delete associated data if you have been given access to do so. For more information on the type of access that you have, see your administrator.
To add an associated record, click on the link that contains a + sign and a new window will open.
To return to the previous screen, select Go Back.
To add a comment about the warrant, select Comment.
If you have not selected Save and you have made some updates to the Warrant, an unsaved data warning message displays.
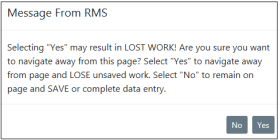
You may want to select No, select Save then continue with Comment.
The Event Date defaults to the current date and time. Enter any comments to the Warrant.
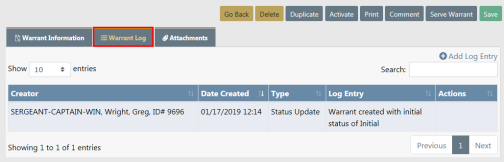
Select Warrant Log to view or add comments. This is also where you can view the date/time of each action taken.
Refer to Warrant Log for more information.
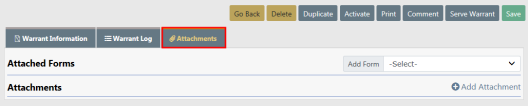
Refer to Warrant Attachments for more information.